ConcurrentHashMap结构
在JDK7中ConcurrentHashMap是基于细粒度分离锁实现的,其结果大致如下:
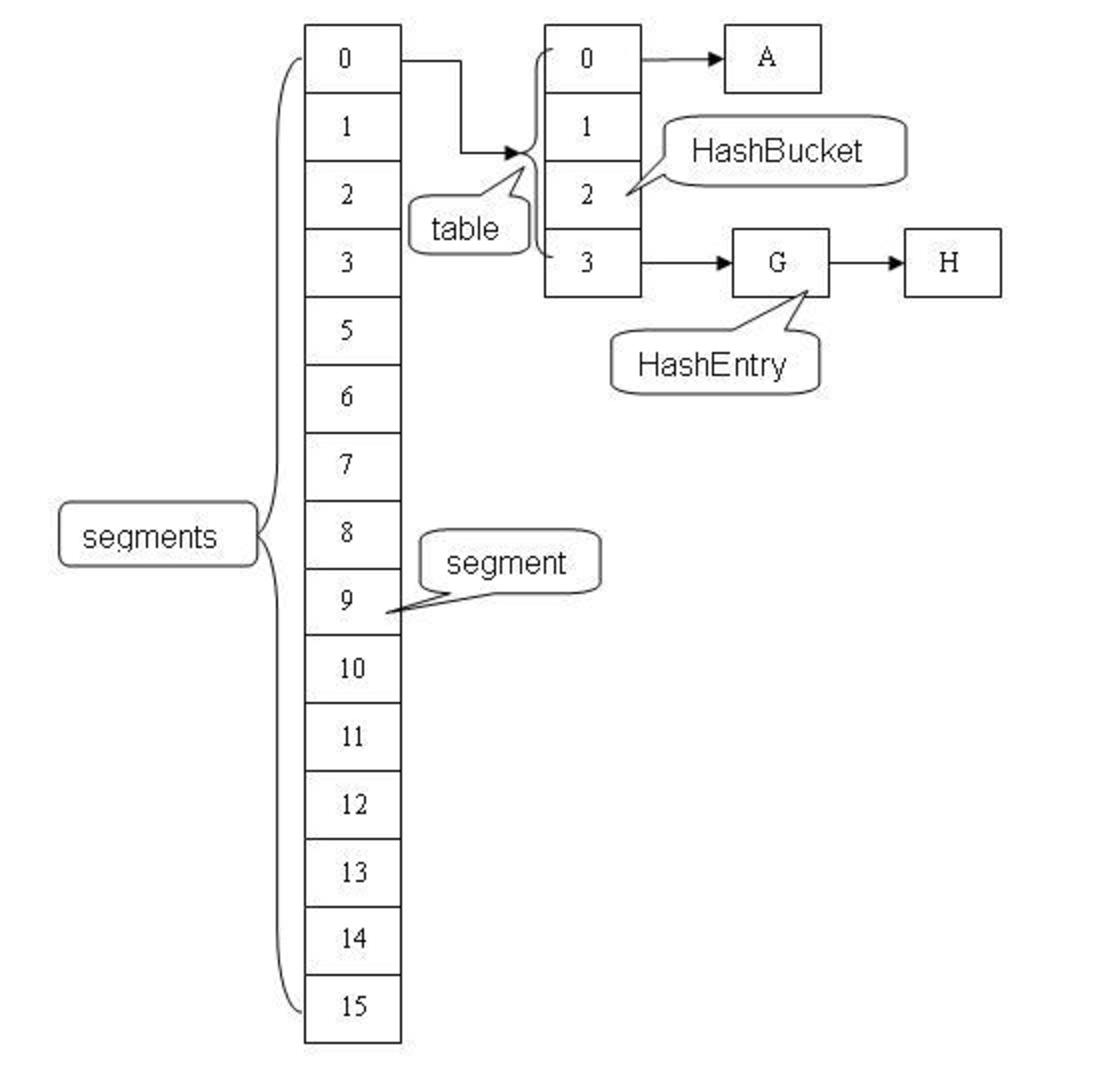
在JDK7中ConcurrentHashMap由多个Segment组成,每个Segment都继承了ReentrantLock,是一把重入锁。
JDK8 中完全重写了ConcurrentHashmap,ConcurrentHashmap实现上和原来的分段式存储有很大的区别,本文讲解的JDK8中ConcurrentHashMap与JDK8的HashMap有相通之处,底层依然由“数组”+链表+红黑树实现,利用全新的CAS算法保证线程安全。Segment虽保留,但已经简化属性,仅仅是为了兼容旧版本。
CAS算法:unsafe.compareAndSwapInt(this, valueOffset, expect, update); CAS(Compare And Swap),意思是如果valueOffset位置包含的值与expect值相同,则更新valueOffset位置的值为update,并返回true,否则不更新,返回false。
CAS作为知名无锁算法,那ConcurrentHashMap就没用锁了么?当然不是,hash值相同的链表的头结点还是会synchronized上锁。
重要属性
我们重点关注几个出镜率比较高的属性
private transient volatile int sizeCtl;
sizeCtl是控制标识符,volatile关键字保证了其线程可见性,不同的值表示不同的意义。
负数代表正在进行初始化或扩容操作
-1代表正在初始化
-N 表示有N-1个线程正在进行扩容操作
正数或0代表hash表还没有被初始化,这个数值表示初始化或下一次进行扩容的大小,类似于扩容阈值。它的值始终是当前ConcurrentHashMap容量的0.75倍,这与loadfactor是对应的。实际容量>=sizeCtl,则扩容。
transient volatile Node<K,V>[] table;
盛装Node元素的数组,在第一次插入时被初始化(延迟初始化,并没有在构造函数执行时进行初始化),它的大小总是2的整数次幂 。
//链表转树阈值,大于8时
static final int TREEIFY_THRESHOLD = 8;
//树转链表阈值,小于等于6时(仅在扩容transfer时才可能树转链表)
static final int UNTREEIFY_THRESHOLD = 6;
重要内部类
Node是最核心的内部类,它包装了key-value键值对,所有插入ConcurrentHashMap的数据都包装在这里面。
相关注意的点在源码中用注释说明:
static class Node<K,V> implements Map.Entry<K,V> {
    final int hash;
    final K key;
    volatile V val;
    volatile Node<K,V> next;

    Node(int hash, K key, V val, Node<K,V> next) {
        this.hash = hash;
        this.key = key;
        this.val = val;
        this.next = next;
    }

    public final K getKey()       { return key; }
    public final V getValue()     { return val; }
    public final int hashCode()   { return key.hashCode() ^ val.hashCode(); }
    public final String toString(){ return key + "=" + val; }
    public final V setValue(V value) {
        throw new UnsupportedOperationException();
    }

    public final boolean equals(Object o) {
        Object k, v, u; Map.Entry<?,?> e;
        return ((o instanceof Map.Entry) &&
                (k = (e = (Map.Entry<?,?>)o).getKey()) != null &&
                (v = e.getValue()) != null &&
                (k == key || k.equals(key)) &&
                (v == (u = val) || v.equals(u)));
    }

    /**
     * Virtualized support for map.get(); overridden in subclasses.
     */
    Node<K,V> find(int h, Object k) {
        Node<K,V> e = this;
        if (k != null) {
            do {
                K ek;
                if (e.hash == h &&
                    ((ek = e.key) == k || (ek != null && k.equals(ek))))
                    return e;
            } while ((e = e.next) != null);
        }
        return null;
    }
}
TreeNode是另外一个核心的数据结构。当链表长度过长的时候,会转换为TreeNode。但是与HashMap不相同的是,它并不是直接转换为红黑树,而是把这些结点包装成TreeNode放在TreeBin对象中,由TreeBin完成对红黑树的包装。
static final class TreeNode<K,V> extends Node<K,V> {
    TreeNode<K,V> parent;  // red-black tree links
    TreeNode<K,V> left;
    TreeNode<K,V> right;
    TreeNode<K,V> prev;    // needed to unlink next upon deletion
    boolean red;

    TreeNode(int hash, K key, V val, Node<K,V> next,
             TreeNode<K,V> parent) {
        super(hash, key, val, next);
        this.parent = parent;
    }

    Node<K,V> find(int h, Object k) {
        return findTreeNode(h, k, null);
    }

    /**
     * Returns the TreeNode (or null if not found) for the given key
     * starting at given root.
     */
    final TreeNode<K,V> findTreeNode(int h, Object k, Class<?> kc) {
        if (k != null) {
            TreeNode<K,V> p = this;
            do  {
                int ph, dir; K pk; TreeNode<K,V> q;
                TreeNode<K,V> pl = p.left, pr = p.right;
                if ((ph = p.hash) > h)
                    p = pl;
                else if (ph < h)
                    p = pr;
                else if ((pk = p.key) == k || (pk != null && k.equals(pk)))
                    return p;
                else if (pl == null)
                    p = pr;
                else if (pr == null)
                    p = pl;
                else if ((kc != null ||
                          (kc = comparableClassFor(k)) != null) &&
                         (dir = compareComparables(kc, k, pk)) != 0)
                    p = (dir < 0) ? pl : pr;
                else if ((q = pr.findTreeNode(h, k, kc)) != null)
                    return q;
                else
                    p = pl;
            } while (p != null);
        }
        return null;
    }
}
TreeNode继承自ConcurrentHashMap的Node类而并非HashMap中的继承自LinkedHashMap.Entry类,也就是说TreeNode带有next指针,这样做的目的是方便基于TreeBin的访问。
TreeBin并不负责包装用户的key、value信息,而是包装的很多TreeNode节点。它代替了TreeNode的根节点,也就是说在实际的ConcurrentHashMap“数组”中,存放的是TreeBin对象,而不是TreeNode对象,这是与HashMap的区别。另外这个类还带有了读写锁。
static final class TreeBin<K,V> extends Node<K,V> {
TreeNode<K,V> root;
volatile TreeNode<K,V> first;
volatile Thread waiter;
volatile int lockState;
// values for lockState
static final int WRITER = 1; // set while holding write lock
static final int WAITER = 2; // set when waiting for write lock
static final int READER = 4; // increment value for setting read lock
/**
* Tie-breaking utility for ordering insertions when equal
* hashCodes and non-comparable. We don't require a total
* order, just a consistent insertion rule to maintain
* equivalence across rebalancings. Tie-breaking further than
* necessary simplifies testing a bit.
*/
static int tieBreakOrder(Object a, Object b) {
int d;
if (a == null || b == null ||
(d = a.getClass().getName().
compareTo(b.getClass().getName())) == 0)
d = (System.identityHashCode(a) <= System.identityHashCode(b) ?
-1 : 1);
return d;
}
/**
* Creates bin with initial set of nodes headed by b.
*/
TreeBin(TreeNode<K,V> b) {
super(TREEBIN, null, null, null);
this.first = b;
TreeNode<K,V> r = null;
for (TreeNode<K,V> x = b, next; x != null; x = next) {
next = (TreeNode<K,V>)x.next;
x.left = x.right = null;
if (r == null) {
x.parent = null;
x.red = false;
r = x;
}
else {
K k = x.key;
int h = x.hash;
Class<?> kc = null;
for (TreeNode<K,V> p = r;;) {
int dir, ph;
K pk = p.key;
if ((ph = p.hash) > h)
dir = -1;
else if (ph < h)
dir = 1;
else if ((kc == null &&
(kc = comparableClassFor(k)) == null) ||
(dir = compareComparables(kc, k, pk)) == 0)
dir = tieBreakOrder(k, pk);
TreeNode<K,V> xp = p;
if ((p = (dir <= 0) ? p.left : p.right) == null) {
x.parent = xp;
if (dir <= 0)
xp.left = x;
else
xp.right = x;
r = balanceInsertion(r, x);
break;
}
}
}
}
this.root = r;
assert checkInvariants(root);
}
/**
* Acquires write lock for tree restructuring.
*/
private final void lockRoot() {
if (!U.compareAndSwapInt(this, LOCKSTATE, 0, WRITER))
contendedLock(); // offload to separate method
}
/**
* Releases write lock for tree restructuring.
*/
private final void unlockRoot() {
lockState = 0;
}
/**
* Possibly blocks awaiting root lock.
*/
private final void contendedLock() {
Thread current = Thread.currentThread(), w;
for (int s;;) {
if (((s = lockState) & ~WAITER) == 0) {
if (U.compareAndSwapInt(this, LOCKSTATE, s, WRITER)) {
if (waiter == current)
U.compareAndSwapObject(this, WAITERTHREAD, current, null);
return;
}
}
else if ((s & WAITER) == 0)
U.compareAndSwapInt(this, LOCKSTATE, s, s | WAITER);
else if ((w = waiter) == null)
U.compareAndSwapObject(this, WAITERTHREAD, null, current);
else if (w == current)
LockSupport.park(this);
}
}
/**
* Returns matching node or null if none. Tries to search
* using tree comparisons from root, but continues linear
* search when lock not available.
*/
final Node<K,V> find(int h, Object k) {
if (k != null) {
for (Node<K,V> e = first; e != null; ) {
int s; K ek;
if (((s = lockState) & (WAITER|WRITER)) != 0) {
if (e.hash == h &&
((ek = e.key) == k || (ek != null && k.equals(ek))))
return e;
e = e.next;
}
else if (U.compareAndSwapInt(this, LOCKSTATE, s,
s + READER)) {
TreeNode<K,V> r, p;
try {
p = ((r = root) == null ? null :
r.findTreeNode(h, k, null));
} finally {
Thread w;
if (U.getAndAddInt(this, LOCKSTATE, -READER) ==
(READER|WAITER) && (w = waiter) != null)
LockSupport.unpark(w);
}
return p;
}
}
}
return null;
}
/**
* Finds or adds a node.
* @return null if added
*/
final TreeNode<K,V> putTreeVal(int h, K k, V v) {
Class<?> kc = null;
boolean searched = false;
for (TreeNode<K,V> p = root;;) {
int dir, ph; K pk;
if (p == null) {
first = root = new TreeNode<K,V>(h, k, v, null, null);
break;
}
else if ((ph = p.hash) > h)
dir = -1;
else if (ph < h)
dir = 1;
else if ((pk = p.key) == k || (pk != null && k.equals(pk)))
return p;
else if ((kc == null &&
(kc = comparableClassFor(k)) == null) ||
(dir = compareComparables(kc, k, pk)) == 0) {
if (!searched) {
TreeNode<K,V> q, ch;
searched = true;
if (((ch = p.left) != null &&
(q = ch.findTreeNode(h, k, kc)) != null) ||
((ch = p.right) != null &&
(q = ch.findTreeNode(h, k, kc)) != null))
return q;
}
dir = tieBreakOrder(k, pk);
}
TreeNode<K,V> xp = p;
if ((p = (dir <= 0) ? p.left : p.right) == null) {
TreeNode<K,V> x, f = first;
first = x = new TreeNode<K,V>(h, k, v, f, xp);
if (f != null)
f.prev = x;
if (dir <= 0)
xp.left = x;
else
xp.right = x;
if (!xp.red)
x.red = true;
else {
lockRoot();
try {
root = balanceInsertion(root, x);
} finally {
unlockRoot();
}
}
break;
}
}
assert checkInvariants(root);
return null;
}
/**
* Removes the given node, that must be present before this
* call. This is messier than typical red-black deletion code
* because we cannot swap the contents of an interior node
* with a leaf successor that is pinned by "next" pointers
* that are accessible independently of lock. So instead we
* swap the tree linkages.
*
* @return true if now too small, so should be untreeified
*/
final boolean removeTreeNode(TreeNode<K,V> p) {
TreeNode<K,V> next = (TreeNode<K,V>)p.next;
TreeNode<K,V> pred = p.prev; // unlink traversal pointers
TreeNode<K,V> r, rl;
if (pred == null)
first = next;
else
pred.next = next;
if (next != null)
next.prev = pred;
if (first == null) {
root = null;
return true;
}
if ((r = root) == null || r.right == null || // too small
(rl = r.left) == null || rl.left == null)
return true;
lockRoot();
try {
TreeNode<K,V> replacement;
TreeNode<K,V> pl = p.left;
TreeNode<K,V> pr = p.right;
if (pl != null && pr != null) {
TreeNode<K,V> s = pr, sl;
while ((sl = s.left) != null) // find successor
s = sl;
boolean c = s.red; s.red = p.red; p.red = c; // swap colors
TreeNode<K,V> sr = s.right;
TreeNode<K,V> pp = p.parent;
if (s == pr) { // p was s's direct parent
p.parent = s;
s.right = p;
}
else {
TreeNode<K,V> sp = s.parent;
if ((p.parent = sp) != null) {
if (s == sp.left)
sp.left = p;
else
sp.right = p;
}
if ((s.right = pr) != null)
pr.parent = s;
}
p.left = null;
if ((p.right = sr) != null)
sr.parent = p;
if ((s.left = pl) != null)
pl.parent = s;
if ((s.parent = pp) == null)
r = s;
else if (p == pp.left)
pp.left = s;
else
pp.right = s;
if (sr != null)
replacement = sr;
else
replacement = p;
}
else if (pl != null)
replacement = pl;
else if (pr != null)
replacement = pr;
else
replacement = p;
if (replacement != p) {
TreeNode<K,V> pp = replacement.parent = p.parent;
if (pp == null)
r = replacement;
else if (p == pp.left)
pp.left = replacement;
else
pp.right = replacement;
p.left = p.right = p.parent = null;
}
root = (p.red) ? r : balanceDeletion(r, replacement);
if (p == replacement) { // detach pointers
TreeNode<K,V> pp;
if ((pp = p.parent) != null) {
if (p == pp.left)
pp.left = null;
else if (p == pp.right)
pp.right = null;
p.parent = null;
}
}
} finally {
unlockRoot();
}
assert checkInvariants(root);
return false;
}
/* ------------------------------------------------------------ */
// Red-black tree methods, all adapted from CLR
static <K,V> TreeNode<K,V> rotateLeft(TreeNode<K,V> root,
TreeNode<K,V> p) {
TreeNode<K,V> r, pp, rl;
if (p != null && (r = p.right) != null) {
if ((rl = p.right = r.left) != null)
rl.parent = p;
if ((pp = r.parent = p.parent) == null)
(root = r).red = false;
else if (pp.left == p)
pp.left = r;
else
pp.right = r;
r.left = p;
p.parent = r;
}
return root;
}
static <K,V> TreeNode<K,V> rotateRight(TreeNode<K,V> root,
TreeNode<K,V> p) {
TreeNode<K,V> l, pp, lr;
if (p != null && (l = p.left) != null) {
if ((lr = p.left = l.right) != null)
lr.parent = p;
if ((pp = l.parent = p.parent) == null)
(root = l).red = false;
else if (pp.right == p)
pp.right = l;
else
pp.left = l;
l.right = p;
p.parent = l;
}
return root;
}
static <K,V> TreeNode<K,V> balanceInsertion(TreeNode<K,V> root,
TreeNode<K,V> x) {
x.red = true;
for (TreeNode<K,V> xp, xpp, xppl, xppr;;) {
if ((xp = x.parent) == null) {
x.red = false;
return x;
}
else if (!xp.red || (xpp = xp.parent) == null)
return root;
if (xp == (xppl = xpp.left)) {
if ((xppr = xpp.right) != null && xppr.red) {
xppr.red = false;
xp.red = false;
xpp.red = true;
x = xpp;
}
else {
if (x == xp.right) {
root = rotateLeft(root, x = xp);
xpp = (xp = x.parent) == null ? null : xp.parent;
}
if (xp != null) {
xp.red = false;
if (xpp != null) {
xpp.red = true;
root = rotateRight(root, xpp);
}
}
}
}
else {
if (xppl != null && xppl.red) {
xppl.red = false;
xp.red = false;
xpp.red = true;
x = xpp;
}
else {
if (x == xp.left) {
root = rotateRight(root, x = xp);
xpp = (xp = x.parent) == null ? null : xp.parent;
}
if (xp != null) {
xp.red = false;
if (xpp != null) {
xpp.red = true;
root = rotateLeft(root, xpp);
}
}
}
}
}
}
static <K,V> TreeNode<K,V> balanceDeletion(TreeNode<K,V> root,
TreeNode<K,V> x) {
for (TreeNode<K,V> xp, xpl, xpr;;) {
if (x == null || x == root)
return root;
else if ((xp = x.parent) == null) {
x.red = false;
return x;
}
else if (x.red) {
x.red = false;
return root;
}
else if ((xpl = xp.left) == x) {
if ((xpr = xp.right) != null && xpr.red) {
xpr.red = false;
xp.red = true;
root = rotateLeft(root, xp);
xpr = (xp = x.parent) == null ? null : xp.right;
}
if (xpr == null)
x = xp;
else {
TreeNode<K,V> sl = xpr.left, sr = xpr.right;
if ((sr == null || !sr.red) &&
(sl == null || !sl.red)) {
xpr.red = true;
x = xp;
}
else {
if (sr == null || !sr.red) {
if (sl != null)
sl.red = false;
xpr.red = true;
root = rotateRight(root, xpr);
xpr = (xp = x.parent) == null ?
null : xp.right;
}
if (xpr != null) {
xpr.red = (xp == null) ? false : xp.red;
if ((sr = xpr.right) != null)
sr.red = false;
}
if (xp != null) {
xp.red = false;
root = rotateLeft(root, xp);
}
x = root;
}
}
}
else { // symmetric
if (xpl != null && xpl.red) {
xpl.red = false;
xp.red = true;
root = rotateRight(root, xp);
xpl = (xp = x.parent) == null ? null : xp.left;
}
if (xpl == null)
x = xp;
else {
TreeNode<K,V> sl = xpl.left, sr = xpl.right;
if ((sl == null || !sl.red) &&
(sr == null || !sr.red)) {
xpl.red = true;
x = xp;
}
else {
if (sl == null || !sl.red) {
if (sr != null)
sr.red = false;
xpl.red = true;
root = rotateLeft(root, xpl);
xpl = (xp = x.parent) == null ?
null : xp.left;
}
if (xpl != null) {
xpl.red = (xp == null) ? false : xp.red;
if ((sl = xpl.left) != null)
sl.red = false;
}
if (xp != null) {
xp.red = false;
root = rotateRight(root, xp);
}
x = root;
}
}
}
}
}
/**
* Recursive invariant check
*/
static <K,V> boolean checkInvariants(TreeNode<K,V> t) {
TreeNode<K,V> tp = t.parent, tl = t.left, tr = t.right,
tb = t.prev, tn = (TreeNode<K,V>)t.next;
if (tb != null && tb.next != t)
return false;
if (tn != null && tn.prev != t)
return false;
if (tp != null && t != tp.left && t != tp.right)
return false;
if (tl != null && (tl.parent != t || tl.hash > t.hash))
return false;
if (tr != null && (tr.parent != t || tr.hash < t.hash))
return false;
if (t.red && tl != null && tl.red && tr != null && tr.red)
return false;
if (tl != null && !checkInvariants(tl))
return false;
if (tr != null && !checkInvariants(tr))
return false;
return true;
}
private static final sun.misc.Unsafe U;
private static final long LOCKSTATE;
private static final long WAITERTHREAD;
static {
try {
U = sun.misc.Unsafe.getUnsafe();
Class<?> k = TreeBin.class;
LOCKSTATE = U.objectFieldOffset
(k.getDeclaredField("lockState"));
WAITERTHREAD = U.objectFieldOffset
(k.getDeclaredField("waiter"));
} catch (Exception e) {
throw new Error(e);
}
}
}
ForwardingNode一个用于连接两个table的节点类,它包含一个nextTable指针,用于指向下一张表。而且这个节点的key value next指针全部为null,它的hash值为-1。生命周期:仅存活于扩容操作且bin不为null时,一定会出现在每个bin的首位。
static final class ForwardingNode<K,V> extends Node<K,V> {
    final Node<K,V>[] nextTable;
    ForwardingNode(Node<K,V>[] tab) {
        super(MOVED, null, null, null);
        this.nextTable = tab;
    }

    Node<K,V> find(int h, Object k) {
        // loop to avoid arbitrarily deep recursion on forwarding nodes
        outer: for (Node<K,V>[] tab = nextTable;;) {
            Node<K,V> e; int n;
            if (k == null || tab == null || (n = tab.length) == 0 ||
                (e = tabAt(tab, (n - 1) & h)) == null)
                return null;
            for (;;) {
                int eh; K ek;
                if ((eh = e.hash) == h &&
                    ((ek = e.key) == k || (ek != null && k.equals(ek))))
                    return e;
                if (eh < 0) {
                    if (e instanceof ForwardingNode) {
                        tab = ((ForwardingNode<K,V>)e).nextTable;
                        continue outer;
                    }
                    else
                        return e.find(h, k);
                }
                if ((e = e.next) == null)
                    return null;
            }
        }
    }
}
三个核心方法
ConcurrentHashMap定义了三个原子操作,用于对指定位置的节点进行操作。正是这些原子操作保证了ConcurrentHashMap的线程安全。
static final <K,V> Node<K,V> tabAt(Node<K,V>[] tab, int i) {
    return (Node<K,V>)U.getObjectVolatile(tab, ((long)i << ASHIFT) + ABASE);
}

static final <K,V> boolean casTabAt(Node<K,V>[] tab, int i,
                                    Node<K,V> c, Node<K,V> v) {
    return U.compareAndSwapObject(tab, ((long)i << ASHIFT) + ABASE, c, v);
}

static final <K,V> void setTabAt(Node<K,V>[] tab, int i, Node<K,V> v) {
    U.putObjectVolatile(tab, ((long)i << ASHIFT) + ABASE, v);
}
初始化initTable
对于ConcurrentHashMap来说,调用它的构造方法仅仅是设置了一些参数而已。而整个table的初始化是在向ConcurrentHashMap中插入第一个元素的时候发生的。
private final Node<K,V>[] initTable() {
    Node<K,V>[] tab; int sc;
    while ((tab = table) == null || tab.length == 0) {
        if ((sc = sizeCtl) < 0)
            Thread.yield(); // lost initialization race; just spin
        else if (U.compareAndSwapInt(this, SIZECTL, sc, -1)) {
            try {
                if ((tab = table) == null || tab.length == 0) {
                    int n = (sc > 0) ? sc : DEFAULT_CAPACITY;
                    @SuppressWarnings("unchecked")
                    Node<K,V>[] nt = (Node<K,V>[])new Node<?,?>[n];
                    table = tab = nt;
                    sc = n - (n >>> 2);
                }
            } finally {
                sizeCtl = sc;
            }
            break;
        }
    }
    return tab;
}
初始化方法主要应用了关键属性sizeCtl 如果这个值小于0,表示其他线程正在进行初始化,就放弃这个操作。在这也可以看出ConcurrentHashMap的初始化只能由一个线程完成。如果获得了初始化权限,就用CAS方法将sizeCtl置为-1,防止其他线程进入。初始化数组后,将sizeCtl的值改为0.75*n。
扩容
当ConcurrentHashMap容量不足的时候,需要对table进行扩容。这个方法的基本思想跟HashMap是很像的,但是由于它是支持并发扩容的,所以要复杂的多。
原因是它支持多线程进行扩容操作,而并没有加锁。我想这样做的目的不仅仅是为了满足concurrent的要求,而是希望利用并发处理去减少扩容带来的时间影响。因为在扩容的时候,总是会涉及到从一个“数组”到另一个“数组”拷贝的操作,如果这个操作能够并发进行,那真真是极好的了。
整个扩容操作分两部分:
- 构建一个nextTable,它的容量是原来的两倍,这个线程是单线程操作的。单线程的保证是通过RESIZE_STAMP_SHIFT变量经过一次运算来保证的。
- 将原来的table数组复制到nextTable中,这里允许多线程操作。
/** The next table to use; non-null only while resizing.
     * 一个过渡的table表,只有在扩容时才使用
     */
    private transient volatile Node<K,V>[] nextTable;
我们首先看下单个线程是如何完成的,它的大致思路就是遍历、复制的过程。首先通过运算得到需要遍历的次数i,然后利用tabAt方法获取位置i处的元素。
(1)如果这个位置为空,就在原table的i位置放入ForwardingNode节点,这个也是触发并发扩容的关键点。
(2)如果这个位置是Node节点(fh>=0),如果它是一个链表的头节点,就构造一个反序链表,把它们分别放在nextTable的i和i+n位置。
(3)如果这个节点是TreeBin节点(fh<0),也做一个反序处理,并且判断是否需要untreefi,把处理结果分别放在nextTable的i和i+n位置。
(4)遍历完所有节点后就完成了复制工作。这时让nextTable作为新的table,并且更新sizeCtl为新容量的0.75倍,完成扩容。
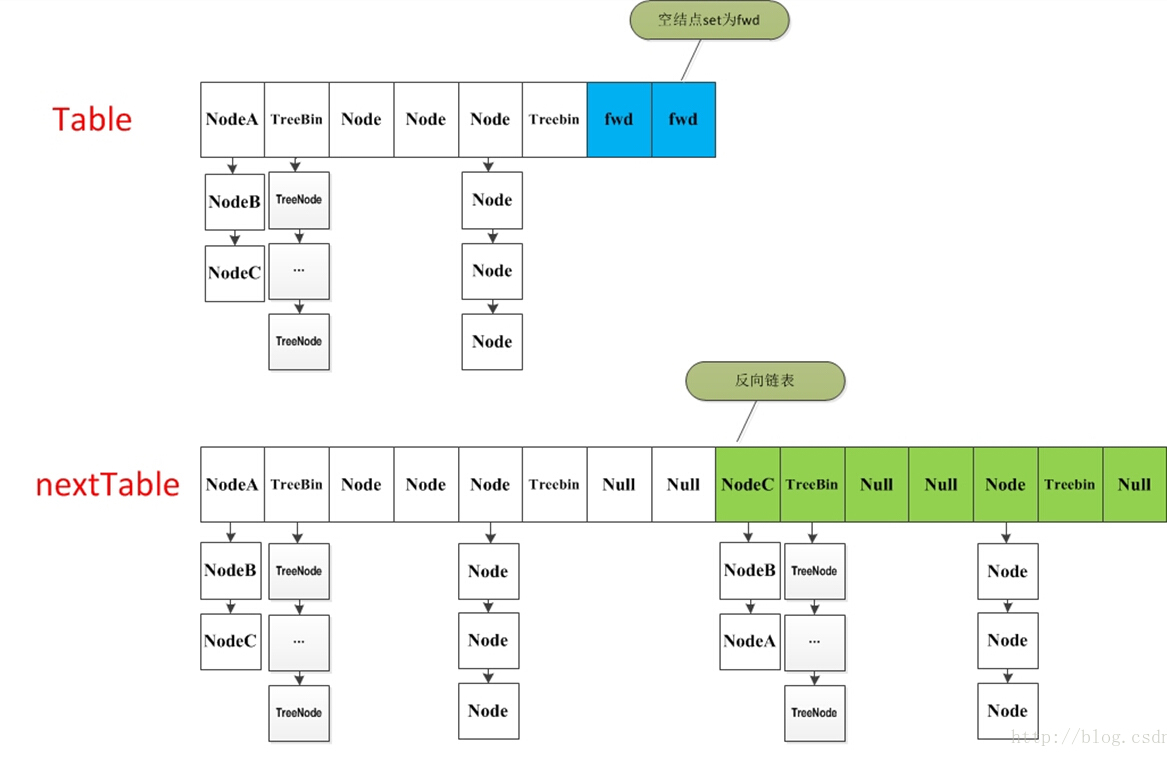
再看下多线程的情况
如果线程遍历到的节点是forward节点,就向后继续遍历,再加上给节点上锁的机制,就完成了多线程的控制。多线程遍历节点,处理了一个节点,就把对应点的值set为forward,另一个线程看到forward,就向后遍历。这样交叉就完成了复制工作。而且还很好的解决了线程安全的问题。这个方法设计很值得学习,数据复制的结构图如下:
put方法
前面的所有的介绍其实都为这个方法做铺垫。ConcurrentHashMap最常用的就是put和get两个方法。
现在来介绍put方法,这个put方法依然沿用HashMap的put方法的思想,根据hash值计算这个新插入的点在table中的位置i,如果i位置是空的,直接放进去,否则进行判断,如果i位置是树节点,按照树的方式插入新的节点,否则把i插入到链表的末尾。
ConcurrentHashMap中依然沿用这个思想,有一个最重要的不同点就是ConcurrentHashMap不允许key或value为null值。另外由于涉及到多线程,put方法就要复杂一点。 在多线程中可能出现下面情况:
- 如果一个或多个线程正在对ConcurrentHashMap进行扩容,当前线程也要进入扩容的操作中。这个扩容的操作之所以能被检测到,是因为transfer方法中在空结点上插入forward节点,如果检测到需要插入的位置被forward节点占有,就帮助进行扩容;
- 如果检查到要插入的节点是非空且不说ForwardingNode节点,就对这个节点进行加锁,保证线程安全。尽管这有些影响性能,但还是比HashTable的synchronized要好很多。
整个流程首先定义不允许key或value为null的情况放入,对于每个放入的值,首先利用spread方法对key的hashCode进行一次hash计算,由此决定这个值在table中的位置。
如果这个位置的值为空,不需要加锁操作,利用 CAS 尝试写入,失败则自旋保证成功。
如果这个位置存在节点,说明发生了hash碰撞,首先判断这个节点的类型,如果是链表节点(fh>=0),则得到的节点就是hash值相同的节点组成的链表的头节点。如果遇到hash值与key值都与新加入节点是一致的情况,则只需要更新value值即可。否则依次向后遍历,直到链表尾插入这个结点。如果加入这个节点以后链表长度大于8,就把这个链表转换成红黑树。如果这个节点的类型已经是树节点的话,直接调用树节点的插入方法进行插入新的值。
get方法
get方法比较简单,给定一个key来确定value的时候,必须满足两个条件 key相同 hash值相同,对于节点可能在链表或树上的情况,需要分别去查找。